Team confirmation is one way of allocating shifts. It allows team leaders to allocate their staff members to shifts.
Team Confirmation can be turned on in the Web Settings Tab on Rota Group Settings. For help with this please click here
These shifts can be assigned from the Team Confirmation page on the member Web Portal:
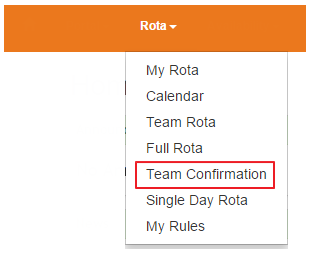
Only staff with the web security level of 'Personal and Team Rota' or higher will be able to view this page.

Allocating shifts using Default Team
If you want to make sure the shifts are allocated to members of one specific Team they will need to have a Default Team assigned to them. Only staff members with the required security level and Team can assign staff members of that Team to work those shifts.
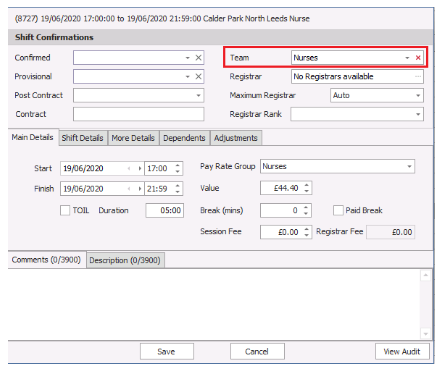
Adding a Default Team is best done on the Shift Pattern Manager by double clicking on a shift to open the Shift Details box and going to Defaults:

A Default Team can be selected by using the drop down box.
Default Teams can also be added to a shift on View Rota by editing a shift and selecting a Team:
Once you have added your Default Teams upload your rota to NetMaster so your staff can allocate shifts to members of their teams.
Allocating shifts without Default Teams
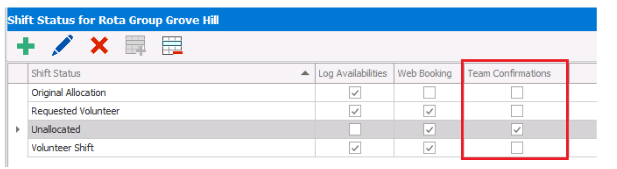
If you don't want to restrict the shifts to be assigned this way to members of a specific team you can turn off the requirement for a confirmed team in Rota Settings>Rota Group Settings>Web Settings:

Once you have done this you will have to go to Rota Settings>Shift Status and ensure you have Team Confirmations ticked for the Statuses you want to appear in the Team Confirmations Page. Once you have done this any shifts with that status will show in Team Confirmations ready to be allocated:
Allocating shifts on the web portal
To allocate shifts using Team Confirmations the member of staff needs to log on to the web portal and go to the Team confirmation page.
There will be a list of all shifts with an assigned team but a blank confirmed name
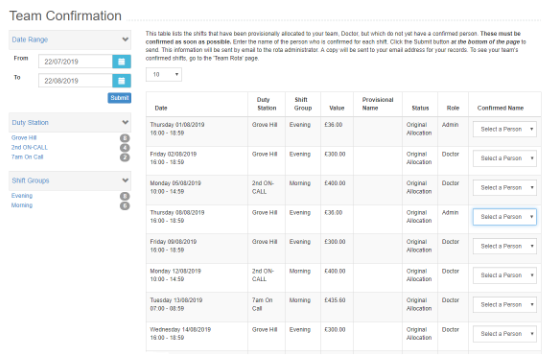
From this screen you can select a Confirmed from the drop down box and press submit at the bottom of the page.
This will add the selected Staff Member into the relevant shift and send an email to the email address set up under the 'Admin' email on Rota Group settings (click here for more information) highlighting the assigned staff members and shifts.